1. The development of the requirement of automobile hub weld inspection
The steel rim is also called the wheel hub. It is a metal component that supports the tire's inner profile and is an important component of the vehicle. Its quality is directly related to human life and safety. The wheel hub is usually made of aluminum alloy or steel. Steel wheels have high strength and are often used in large trucks. Therefore, the requirements for all aspects are very high. Laser welding machine is used for the welding of steel wheel hub. The pulse laser generated by the laser is radiated to the surface of the workpiece after beam expanding, reflection, and focusing. The surface heat is diffused to the inside through thermal conduction, and the width, energy, and peak value of the laser pulse are precisely controlled by digitization to make the workpiece melt and form a specific melting pool,, thereby achieving laser precision welding of the workpiece. In the laser welding of automobile wheel hub, the detection of weld penetration is an important quality indicator of laser deep penetration welding. Therefore, it is of great significance to provide effective detection means for the detection of the weld penetration of hubs.
2. The principle of phased array ultrasonic detection of automobile wheel welds
2.1 Phased array transmitting and receiving
The transmitting and receiving principle of phased array ultrasonic is shown in the figure. When transmitting, the data acquisition unit triggers the phased array unit, and the phased array unit triggers the excitation square wave pulse to excite the probe in turn according to the set delay law, so as to focus the ultrasonic wave emitted by each element in the probe at a certain point.; when receiving, the ultrasonic waves reflected by the defect reach each receiving element, according to the echo signal of each receiving element, the phased array unit can be combined into a signal and transmitted to the data acquisition unit. Therefore, every time the phased array is transmitted and received, it will obtain an A-scan signal synthesized by the multi-element acquisition signal. Through electronic scanning technology, the phased array ultrasonic inspection can realize the display of the workpiece cross-sectional image.
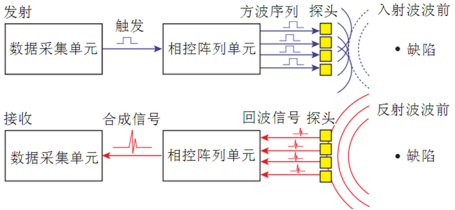
Phased array transmitting and receiving
2.2 Phased array electronic scanning
Phased array ultrasonic has unique electronic scanning and focusing, so a multi element phased array probe can be used to scan and detect the cross-section of the workpiece without moving the probe. This solution uses linear scanning and uses different element groups of the phased array probe with the same aggregation rule. By changing the position of the activated element, the sound beam is moved back and forth along the direction of the element array to achieve a forward and backward movement similar to conventional manual ultrasonic detection probe. The principle of linear scanning is shown in the figure.
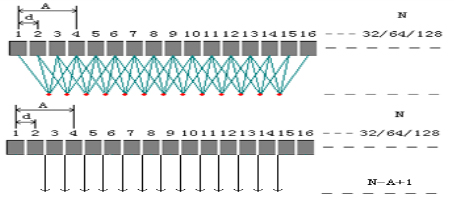
Principle of linear scanning
2.3 Phased array C-scan imaging
Electronic scanning with phased array can scan a certain width of the workpiece without moving the probe. Therefore, compared with the conventional sawtooth scanning method of single element probe, phased array scanning can obtain the C-scan image of the workpiece only with a single axis linear scanning. Therefore, for the welding seam of automobile wheel hub, only the probe is placed at the welding seam position, and the scanning inspection of phased array can be completed after the wheel hub rotates for one circle.
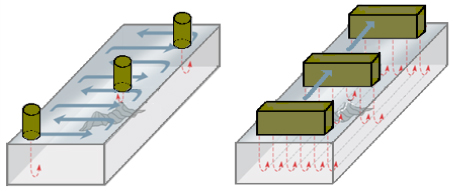
Conventional scanning and phased array scanning
3. Phased array ultrasonic inspection system for automobile wheel hub
3.1 Overall technical solution of the system
The 3D diagram of the overall technical solution of the system is shown in the figure, using a rotating platform and a water tank split structure, the detection instrument is installed on the rotating platform, fully digitalized ultrasound imaging, supporting ultrasound A / B / C scanning imaging; imaging software system based on the PC platform, it provides complete software operation functions. The detection system has manual (including continuous and inching) control and automatic scanning control functions. It has the up-down, front-back adjustment structure required by the probe, and has abnormal alarm and emergency protection measures.

3D illustration of the overall technical solution of the system
3.2 Brief description of each part of the equipment
Water tank:
Water tank, as shown in the figure, is separate from the rotating platform. With capacity of 31L. It has its own hydraulic pump and controls the water supply of the equipment by controlling the hydraulic valve. In addition, the water used for scanning is not recycled.
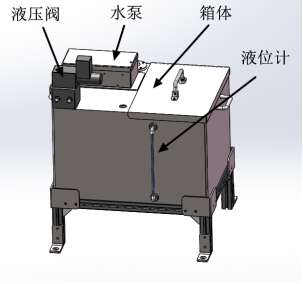
Water tank
Rotary scanning platform:
The rotating scanning platform is the main body of the equipment. The phased array ultrasonic testing instrument is installed on the cantilever of the platform, and the probe + encoder component is also installed on the platform. The detection part of the automobile wheel hub is the laser welding seam of the inner and outer ring of the automobile wheel hub, as shown in the red part.
The automobile hub is fixed on the rotating platform through the inner circle positioning, and the motor drives the automobile hub to rotate, with the maximum speed of 8rpm, and the speed can be adjusted by the motor debugger; the probe + encoder component is installed on the side of the platform, and the structure of the component is shown in Figure 7. When the workpiece is being transported and unloaded, the probe + encoder component is in the retracted state, when the workpiece is placed after setting, the probe + encoder is driven by the electric push rod, so that the probe and the hub surface contact each other, and the gap between the probe and the workpiece is coupled by water spraying.
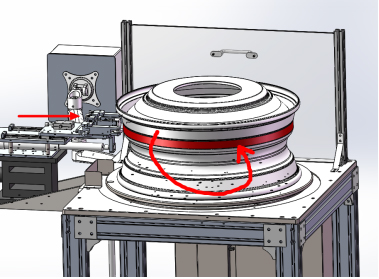
Rotary scanning platform
Probe + encoder component:
The probe + encoder component is installed on the mounting plate of the rotating platform. The mounting plate has a spring floating structure. The entire component is driven by an electric push rod to adjust the front and rear positions of the probe. The upper and lower positions of the component are adjusted by adjusting the platform in the Z direction, as shown in the figure.

Probe + encoder component
PA instrument:
The CTS-PA22X is a modular ultrasonic phased array detection platform supporting secondary development. It integrates advanced technologies such as precision analog circuit, high-speed digital circuit, phased array signal processing, software system, network, etc. It can be widely used in phased array ultrasonic detecting of various workpieces.

CTS-PA22X
3.3 Introduction of detection software interface
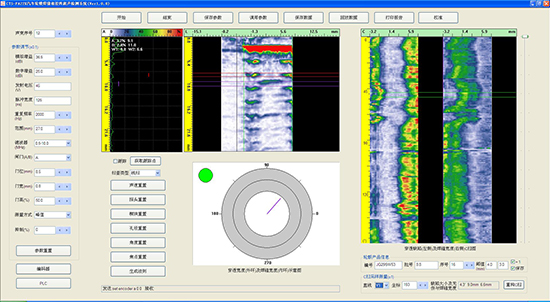
Detection software interface


